Introducing ProblemTracker Enterprise Edition Version 5.0.2 (PTEE 5.0.2)
ProblemTracker Enterprise Edition Version 5.0.2 is a new product offered in addition to the standard product, ProblemTracker Version 5.0.2. ProblemTracker Enterprise Edition includes all of the features available in the standard product as well as 2 new features, Alerts and Discussion.
License Requirements for PTEE Version 5.0.2 and ProblemTracker Version 5.0.2
PTEE 5.0.2 and ProblemTracker Version 5.0.2 require new license key(s). Your ProblemTracker Version 3 license keys will not work with Version 5 products.
In order to upgrade to ProblemTracker Version 5.0.2, your support and upgrades subscription must be active (or at least active through 9/30/2002). If your subscription is current, you will receive a ProblemTracker Version 5 license key(s) via email. Please do not install Version 5.0.2 if you do not have your Version 5 License Keys. If you believe your subscription is current and have not yet received your Version 5 license key, contact NetResults Sales to inquire about your license key(s).
To renew your subscription, click here for the support renewal form (pricing information is listed in the "Order Information" section). If you have any questions regarding your subscription, please contact NetResults Sales.
In order to upgrade to ProblemTracker Enterprise Edition Version 5.0.2 (PTEE 5.0.2) to use the new Alerts and Discussion features, you must purchase license keys for this product. To upgrade to PTEE 5.0.2, please click here for the order form or contact NetResults Sales for more information.
New Features
For a more detailed list of new features and fixes in 5.0.2, click here.
System Requirements for ProblemTracker Version 5.0.2
NetResults ProblemTracker 5 has the following requirements. These requirements have changed since the version of ProblemTracker you are currently using. Listed first are the requirements for use of multinationalization features (languages other than western European languages). Multinationalization features require newer versions of web browsers and web servers as many international web features have only recently been supported (and many standards are in fact still "in progress" in this area). Listed second are the requirements if you do not require multinational support. If any of the required software listed below is not installed on your server machine (or if you do not know if it is installed), click here for instructions on how to verify that you have the appropriate software, links to download the software, and instructions on how to install it.
Multinationalization
General System Requirements
In order to use Multinationalization options (support of Non-Latin1languages):
Latin1 languages include the following - Basque, Catalan, Danish, English, Dutch, Finnish, French, German, Icelandic, Italian, Norwegian, Portuguese, Spanish, Swedish. If you plan to use a language other than one (or more) of those listed above, your system requires the following.
Client Requirements:
- Any platform on which Internet Explorer (version 5.0 or greater) or Netscape (version 6.2 or greater) is available.
- Microsoft Internet Explorer (version 5.0 or greater) or Netscape (version 6.2 or greater).
Server Requirements:
- 450 MHz Intel Pentium III or compatible system (866 MHz Pentium III or faster recommended).
- 128 MB RAM for Windows NT, 192 MB for Windows 2000 (256 MB recommended for Windows NT, 512 MB recommended for Windows 2000).
- 4 GB Hard Drive, however you may need a larger hard drive if you plan to install multiple workgroups (ProblemTracker uses approximately 10 MB of hard disk space for each workgroup).
- Windows 2000 Server.
- Microsoft Internet Information Server 5.0 with Microsoft hotfix http://support.microsoft.com/support/kb/articles/Q294/8/31.ASP or Windows 2000 Service Pack 3 (which includes the hotfix). This hotfix is required to address a known bug in the IIS support for the UTF-8 (Unicode) character set.
- Microsoft JET 4.0 Service Pack 5 or greater. This is included in Windows 2000 Service Pack 2 and can be downloaded for earlier versions of Windows 2000.
- Visual SourceSafe 6.0 with Service Pack 5 or greater. This is only required if you wish to use the source code control integration features.
Optional Database Support:
In addition to the included support for Microsoft Access, ProblemTracker can be used with the following database systems:
- Microsoft SQL Server 7.0
- Microsoft SQL Server 2000
- Oracle 8i
- Oracle 9i
General System Requirements (if not using Multinationalization):
Client Requirements:
- Any platform on which either Netscape Navigator/Communicator version 4.07 or greater, Netscape version 6.2 or greater, or Internet Explorer version 5.0 or greater is available.
- Netscape Navigator/Communicator version 4.07 or greater, Netscape version 6.2 or greater (6.0/6.1 not supported) or Microsoft Internet Explorer version 5.0 or greater.
Server Requirements:
- 450 MHz Intel Pentium III or compatible system (866 MHz Pentium III or faster recommended).
- 128 MB RAM for Windows NT, 192 MB for Windows 2000 (256 MB recommended for Windows NT, 512 MB recommended for Windows 2000)
- 4 GB Hard Drive, however you may need a larger hard drive if you plan to install multiple workgroups (ProblemTracker uses approximately 10 MB of hard disk space for each workgroup).
- Windows NT 4.0 Workstation or Server, Windows XP Professional or Windows 2000 Server (Windows 2000 Server recommended).Windows XP Professional is not supported for use with an Oracle 8i or 9i database. Windows XP Professional is only recommended for evaluation purposes since it is not a "server" platform. Click here for more information.
- Microsoft Internet Information Server 4.0 or 5.0 (IIS 5.0 recommended).
- JScript 5.1 or greater. This is included in Windows 2000 and Internet Explorer 5.5 or greater. It can also be downloaded and installed separately.
- Microsoft Data Access Components (MDAC) 2.5 or greater. This is included in Windows 2000 and can be downloaded for Windows NT 4.0.
- Microsoft JET 4.0 Service Pack 5 or greater. This is included in Windows 2000 Service Pack 2 and can be downloaded for Windows NT 4.0 and earlier versions of Windows 2000.
- Visual SourceSafe 6.0 with Service Pack 5 or greater. This is only required if you wish to use the source code control integration features.
Optional Database Support:
In addition to the included support for Microsoft Access, ProblemTracker can be used with the following database systems
- Microsoft SQL Server 7.0
- Microsoft SQL Server 2000
- Oracle 8i
- Oracle 9i
Windows XP Professional is to be used as a platform for evaluation purposes only.
Windows XP Professional is classified by Microsoft as a "desktop" operating system. There is no "server" version of Windows XP Professional. As such, the Microsoft license agreement for and implementation of IIS (the web server) severely restricts the number of concurrent users (a maximum of 10 concurrent connections, and a single browser may use multiple connections). Therefore, we support the use of Windows XP Professional with ProblemTracker for evaluation purposes only. Windows XP Professional is not supported as a production platform. Windows 2000 Server is recommended for use with ProblemTracker in a production environment.
Known Issues in ProblemTracker Version 5.0.2
-
There are no known issues to report for this version.
Upgrade Preparation
Ensure your machine is prepared with the necessary components before upgrading to ProblemTracker 5 by reviewing the Preparation for Installing ProblemTracker section of the Online Help document.
A review of how several new features in ProblemTracker Version 5.0.2 can affect your ProblemTracker 3 data is presented here. Recommendations to help you take advantage of these new features are also included below.
Getting to Know ProblemTracker 5
Probably the best way to "test drive" the new features of ProblemTracker 5 is to make use of the default workgroup (pteval) which is optionally installed along with ProblemTracker 5. To login to this workgroup, select Start->Programs->NetResults ProblemTracker 5->ProblemTracker Eval Version->Login Page, and enter Admin as the username and password. This workgroup is configured with the default (code template) configuration that a newly added Version 5 workgroup will have (it is what you would get by using the Add operation in the Workgroup Management System). You can use this as a test bed when reviewing the features described below. You can install this on a test system (test system use limited to 15 days).
Windows NT 4.0 Service Pack 6a now required for use with ProblemTracker Version 5.0.2
If you have installed ProblemTracker on a Windows NT 4.0 machine, Service Pack 6a is now required for use with ProblemTracker Version 5.0.2. This will allow you to take advantage of the bug fixes related to IIS 4.0 and security. Service Pack 6a can be downloaded from Microsoft at: http://www.microsoft.com/ntserver/nts/downloads/recommended/SP6/allSP6.asp
Workgroup Management System
The Workgroup Management System is a new interface for adding, modifying, and removing ProblemTracker workgroups. As mentioned in the instructions in the readme file that follow below, you will be using the Workgroup Management System as the central location to upgrade your ProblemTracker workgroups.
A comprehensive description of the Workflow Management System can be found in the WMS Overview section of the Version 5 Online Help document.
Change in URLs
ProblemTracker's web pages have been converted to Active Server Pages (ASP). Therefore, all URLs associated with the pages installed by ProblemTracker now end in ".asp" rather than ".htm".
Character Sets
The latest version of ProblemTracker supports multinationalization (double byte character sets such as Chinese, Japanese, Arabic, Greek, etc. can be entered into ProblemTracker). When upgrading your workgroups from Version 3.x to the latest version, you will be given the opportunity to select a character set for your workgroups. Please be sure to select the character set that is appropriate for the languages you wish to support within each workgroup. ProblemTracker does not support migration to another character set after a workgroup has been upgraded or created. For information to help you choose the correct character set, please review the Character Set information in the Workgroup Management System Help Guide.
Workflow Enhancements
In ProblemTracker 5, your existing workflow will look slightly different in the Define Workflow page of the Admin section due to the Workflow Enhancements that have been added.
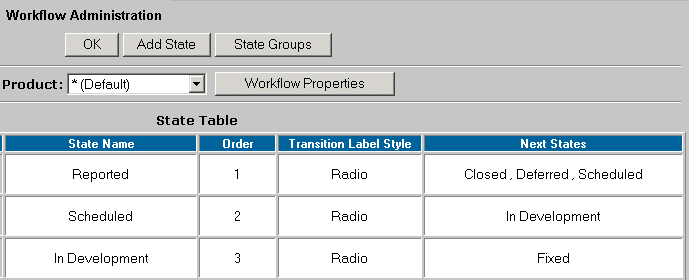
Instead of having a workflow browser, ProblemTracker 5 lists all states on the State Table as shown below. Each state in your workflow will be listed in alphabetical order. You may wish to assign an order for your states as displayed in the figure below. To do this, click on the Edit button to the left of each state and enter a number for the order.
In previous versions, only one next state could be defined for each state and next states were displayed after a green arrow. In ProblemTracker 5, a state can have multiple next states (as displayed in the "Next States" column below).
Also in earlier versions, a previous state was displayed after a red arrow. In ProblemTracker 5, we no longer refer to states as "previous states". This is because each state can have multiple transitions (or paths) to other states. If your workflow has a previous state in Version 3.x, this will be displayed in the Next States column in the State Table. Using the figure below as an example, in Version 3.x the state "In Development" was a previous state for the "In Test" state. Once this data was upgraded to ProblemTracker 5 the "In Development" state is listed in the "Next States" column for the "In Test" state.
The fields "Next State" and "Previous State" are no longer located in the "Edit State" page in ProblemTracker 5. The purpose of having "next state" and "previous state" in former versions was to create a path from a state to another state. You can create a path from a state to another state in ProblemTracker 5 by adding a transition. Details on adding a new transition can be found in the Help section Workflow Transitions .
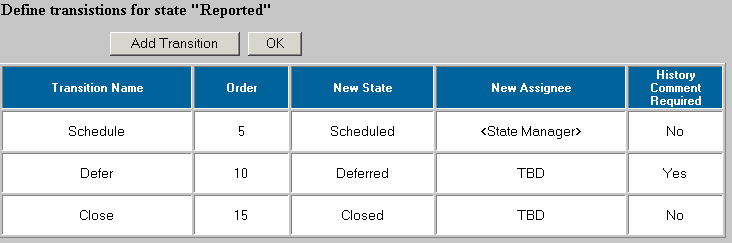
The fields "Assign to On Next State" and "Assign to On Previous State" are no longer located in the "Edit State" page in ProblemTracker 5. Within a transition for a state, the field "New Assignee" replaces both "Assign to On Next State" and "Assign to On Previous State" fields. The figure below shows the transitions for the "Reported" state. Using the figure as an example, in Version 3.x the state "Scheduled" was listed as a next state for the "Reported" state and "State Manager" selected for the field "Assign to On Next State". Once this data was upgraded to ProblemTracker 5, a transition called "Schedule" was created where the "Scheduled" state is listed as the "New State" (the state where a problem record will go when this transition is selected during the Task operation). "<State Manager>" is listed as the "New Assignee" (the user the problem record will be assigned to when this transition is selected during the Task operation).
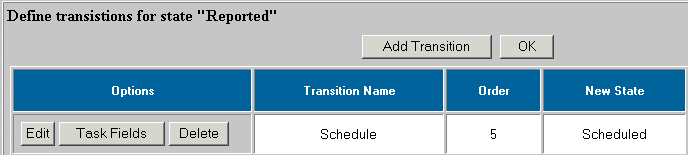
In previous versions, task fields could be set selecting a state from the pulldown and clicking on the "Task Fields" button on the Define Workflow page. In ProblemTracker 5, task fields can now be selected within each transition. The figure below shows the "Task Fields" button for a transition.
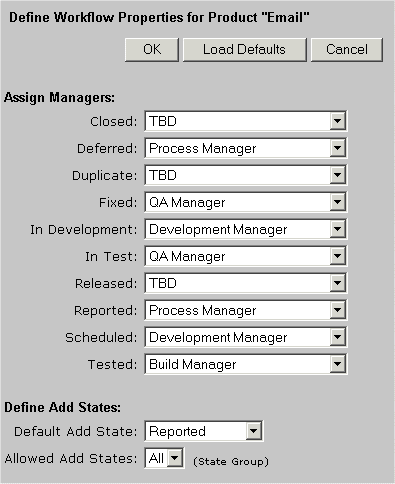
In versions prior to ProblemTracker 5, the "Default Add State" could be set within the "Edit State" page. In ProblemTracker 5, this field has been expanded such that it can be set on a per-product basis. In addition, the "Assign Managers" section has been renamed as "Workflow Properties". The "Default Add State" field can be found in the Workflow Properties section as shown below.
If you are using "Status" as a Task Field for a state(s) in your current version, after you upgrade to ProblemTracker 5, this state(s) will have a transition called "Update" with "Next State" set to "Prompt with State Group - All". "Prompt with State Group - All" indicates that when this transition is selected during the Task operation, the user will be prompted with a list of states which belong to the state group called "All".
"Status" cannot be a Task Field in ProblemTracker 5 because the ability to create multiple transitions for each state makes it unnecessary to have "Status" as a task field. If there is more than one possible state for a record to go to, you should simply create a transition that goes to each of those possible states. For example, from the "Reported" state, a problem record can go to the "Scheduled", "Deferred", or "Closed" states. In previous versions, you would need to set "Status" as a task field to be able to choose any of those states during the Task operation. In ProblemTracker 5, you can create a transition for each possible state as shown in the figure for Item #2 above. The advantage with using transitions instead of having every single state to choose from is that users are prevented from selecting other states that may not be relevant. Information on customizing transitions can be found in the Help section Workflow Transitions.
If you are using "Assigned To" as a Task Field for a state(s) in your current version, after you upgrade to ProblemTracker 5, this state(s) will have a transition with "New Assignee" set to "Prompt with User Group - Users". "Prompt with User Group - Users" indicates that when this transition is selected during the Task operation, the user will be prompted with a list of possible assignees which belong to the user group called "Users".
"Assigned To" cannot be a Task Field in ProblemTracker 5 because the ability to select and limit the list of possible Assignees within a transition makes it unnecessary to have "Assigned To" as a task field. One example to consider, when a problem record moves from the "Scheduled" state to the "In Development" state, a problem record can be assigned to anyone in the "Developers" group. In previous versions, you would need to set "Assigned To" as a task field to be able to choose one of the members of the Developers group. In ProblemTracker 5, you have the ability to limit the list of possible assignees to a particular user group (in this case, the "Developers" group). The advantage with using this method is that users are prevented from selecting an assignee that may not be relevant. A complete discussion of options for the "New Assignee" field in a transition can be found in the Help section Workflow Transitions.
- For additional security, you may want to enable the option called "Restrict Task Operation to Current Assignee". This option will only allow the Task operation to be performed on a problem record by the user who is currently assigned to it. This is useful if you are concerned that users may be tasking records that are not their responsibility. For information on enabling this option, please refer to the Help section General Preferences.
General and Personal Preferences
Several items from the General Preferences page have been moved to a section called "User Preferences". In addition, these options can be customized by each user in the Personal Preferences section. When a new user is created in a ProblemTracker database, this user will use the settings listed in the section "Default Personal Preferences for New Users" listed on the User Preferences page of the Admin section until he / she changes the settings in their Personal Preferences page. The Help section called User Preferences contains more information on setting global default settings. The Help section called Logging In contains more information on setting personal preferences.
Email Notification to Multiple Users
ProblemTracker 5 now allows email notification messages to be sent to a user group. In ProblemTracker Version 3, one could enter multiple email addresses in a user's profile so that email notification messages could be sent to multiple users automatically. In ProblemTracker 5, this workaround is no longer necessary as ProblemTracker can be configured to email a user group. Information on using this feature can be found in the Email Notification Preferences section of the ProblemTracker Online Help document.
File Permissions
The installation set up program now creates a Local Windows User Account as a member of the "Guests" group on the machine where ProblemTracker is installed. This account is installed for use with the workgroups created by the Workgroup Management System. The account is created with the user name "PUSR4<hostname>" where <hostname> is the TCP / IP name of the machine where ProblemTracker is installed.
Time Zone Support
When upgrading to ProblemTracker 5, you will be asked to select time zone preferences. ProblemTracker now supports the use of multiple time zones within a workgroup, meaning that your users can select their own time zone for displaying date and time information in ProblemTracker irrespective of the time zone setting of the ProblemTracker server machine. While running the installation set up program, you will be asked to select a time zone for the ProblemTracker installation. You must select the same time zone as the time zone that is selected in the machine's operating system. Failure to select the same time zone will result in incorrect date and time values in your ProblemTracker data. These incorrect values cannot be corrected at a later time.
You will also have the opportunity to select a time zone for each workgroup you upgrade and each new workgroup (database) you create in the Workgroup Management System. Each workgroup can have a different time zone than the ProblemTracker server machine. In addition, within each workgroup, each user can select their own time zone by modifying their Personal Preferences.
When selecting a time zone for each of the options above, you will also be prompted to select whether Daylight Savings Time (DST) is observed. If you have selected a time zone that observes Daylight Savings Time, it is recommended that you allow ProblemTracker to account for DST by either checking the box or selecting Yes when prompted for this information. A list of time zones supported by each supported operating system can be found in the following Help sections: Windows 2000 / XP or Windows NT 4.0
Field Level Visibility
Field Level Visibility is now available in ProblemTracker. This feature allows fields to be made visible or invisible on the various ProblemTracker pages based on a user's group. For example, the Product field can be visible to the Managers group on the Add page, but is not visible to the Users group on the Add page. This feature allows an additional level of security to be added for the fields on the data record. By default, all fields are made visible to the Users group on the various ProblemTracker pages. Information about configuring field level visibility is available in the User Groups section of the Online Help document.
User Management
In ProblemTracker 5, users for all workgroups are now managed in a central interface in the Workgroup Management System. This interface is called the License Administration section. In previous versions of ProblemTracker, a user could be added and edited within an individual workgroup. If the same user was a member of multiple workgroups, that user would need to be maintained in each of those workgroups. With the License Administration section, a user's account can be maintained in one location that updates all workgroups. Within each workgroup, a user can be assigned to user groups as in previous versions.
If you are using (or plan to use) multinational workgroups in ProblemTracker, any users with a User Id that contains double-byte or other special characters that are only supported in the UTF-8 character set (Unicode), can only be used in a workgroup with UTF-8 selected as the character set. For more information about choosing a character set for a workgroup, please review the Adding a Workgroup section of the Workgroup Management System Help Guide.
When upgrading a workgroup to ProblemTracker 5, you will be prompted to upgrade your users. If you are upgrading multiple workgroups to ProblemTracker 5 and have user accounts that belong to more than one workgroup (excluding the built-in users Admin, Inet, TBD), you may be prompted to resolve "User Conflicts". User Conflicts are instances where a user id appears in more than one of your workgroups, but has different profile information (email address, phone number, address, etc.). You will be asked to resolve the conflict by selecting the profile information that should be saved for the user account. If you are using multiple workgroups, it is possible that you have a user account with the same user id in multiple workgroups. Upon upgrade to Version 5, these user accounts with the same user id will be merged into a single user account. If you do not wish for these multiple accounts to be merged during the upgrade, before upgrading please rename the user accounts such that they no longer have the same user id.
If you choose to install the evaluation workgroup (pteval) during the Version 5.0.2 installation setup program, a set of 6 default users will be created in the License Administration section. These default users may cause you to exceed the number of users allowed based on your license key(s) if you have other users defined in your workgroup(s). For example, if you have a license key for 5 static users. You have one workgroup with 5 users defined and choose to install the pteval workgroup. After upgrading your workgroup to Version 5.0.2. you will have your original 5 users + 6 default users created for use in the pteval workgroup. You can use the Delete User operation to delete the 6 default users. The names of the 6 default users are "dev_mgr", "qa_mgr", "process_mgr", "bld_mgr", "dev_one", and "qa_one". After deleting the default users, your original users can still use the pteval workgroup. Simply give your original users access to the pteval workgroup by using the Edit User Access operation.
Please review the License Administration section of the Workgroup Management System (WMS) Help Guide for details about adding and maintaining users in ProblemTracker.
If you are using Access or case-insensitive SQL Server as your database type, click here to skip the remaining paragraphs in this section, which only apply to Oracle or case-sensitive SQL Server users. If you are using Oracle or case-sensitive SQL Server as your database type, a conflict will arise when user ids that differ only in case (for example, "user_one" and "User_One") are upgraded to Version 5.0.2. If you have any user accounts with User Ids that differ only in case, one of the following conflicts may arise when upgrading to Version 5.0.2 (for example, you have a user id called "user_one" and another user id called "User_One").:
Case 1: If these user accounts are present in the same workgroup, after upgrading to Version 5.0.2 only one of the user accounts will be able to login to the workgroup. In order to avoid this conflict, rename one of the user ids prior to upgrading to Version 5.0.2 so that the user ids are no longer the same when the case is ignored (for instance, you can change "User_One" to be "user1"). To rename a user account prior to upgrade, login as Admin to the workgroup(s) where the user id is present, click on the Admin icon, then click on the User Administration button. Click on the Edit button to the left of the user account you wish to modify, rename the user id, then click OK to save your changes. After renaming the user id, you can upgrade your installation to Version 5.0.2. If you already upgraded to Version 5.0.2 without renaming one of the user ids, you can rename one of the user ids by using the Edit User operation in the Workgroup Management System.
Case 2: If these user accounts are present in different workgroups, after upgrading to Version 5.0.2 both user ids will be merged into a single user id. If you do not wish to have both user ids merged into a single user id, rename one of the user ids prior to upgrading to Version 5.0.2 so that the user ids are no longer the same when the case is ignored (for instance, you can change "User_One" to be "user1"). To rename a user account prior to upgrade, login as Admin to the workgroup(s) where the user id is present, click on the Admin icon, then click on the User Administration button. Click on the Edit button to the left of the user account you wish to modify, rename the user id, then click OK to save your changes. After renaming the user id, you can upgrade your installation to Version 5.0.2.
Viewing User Profile Information
A new feature has been added to allow user names that appear on the Home, Query, and View pages to appear as clickable links. When clicking on a user name on these pages, a separate window will be displayed with the user's profile information as entered in the License Administration section of WMS. This feature is only enabled by default for the Admin group. To allow other user groups to use this feature, enable the user group privilege called "View User Information" for these user groups. This can be done in the User Administration section of the workgroup.
The difference between "Add & Copy" and "Add"
In ProblemTracker 5, there are 2 ways to add a new record.
Option 1: Use the "Add" button to save a new record
Option 2: Use the "Add & Copy" button to save a new record
To add a new record using the "Add" button:
- Click on the Add icon in the top button bar
- Enter information into the fields on the Add page
- Click on the "Add" button to save the new record
Creating a new record using this method will save the new record, then the Add page will be reloaded with all fields set to blank (e.g. for text & date fields) or default values (e.g. for pulldown fields). The function of the "Add" button has changed from ProblemTracker 3 and 4. In ProblemTracker 3 and 4, when the "Add" button was used to save a new record, the Add page would be reloaded, but the values of the pulldown fields would be displayed as they were entered in the record that was saved. This would allow a user to add a second record with similar information in the pulldown fields. This is now done by the "Add & Copy" button explained below. In ProblemTracker 5, when "Add" button is clicked to save a record, the Add form will re-set all fields to blank or default values.
To add a new record using the "Add & Copy" button:
- Click on the Add icon in the top button bar
- Enter information into the fields on the Add page
- Click on the "Add & Copy" button to save the new record
Creating a new record using this method will save the new record, then the Add page will be reloaded with some fields keeping the same value as was entered in the record you just saved. The Add page is set in this way so that it is ready for you to create another record. This is useful in cases where multiple records need to be added with similar information to be assigned to different departments, projects, or versions. You can customize which fields are saved for the next added record by editing the field attributes in the Define Record section of the Administration page.
Metrics
The Summary (Charts & Graphs) section has been changed to Metrics. The Metrics page allows you to create saved charts for personal use and user groups. Saved Charts can also be run based on the results of a Saved Query to limit the data set. Access to the Metrics page and the ability to save group charts and chart layouts are privileges that are enabled for the Users group by default. To change the privileges related to Metrics, please refer to the User Group Privileges section of the Administrative Help Guide. For more details on using the new Metrics features, please review the Metrics section of the User Help Guide.
"Read-Only" Task Fields
The ability to configure "read-only" task fields is available in ProblemTracker 5. This allows a field that cannot be modified to be displayed during the task operation. Date fields can be configured as "read-only", initialized task fields. This allows a date field to be initialized (set with the current date & time) during the task operation, but cannot be modified by the user. More information on "read-only" task fields can be found in the Workflow Transitions section of the Administrative Help Guide.
ProblemTracker Enterprise Edition Version 5.0.2 (PTEE 5.0.2) Features
If you are simply upgrading to ProblemTracker Version 5.0.2 (standard edition) without purchasing PTEE 5.0.2, click here to skip this section. If you have purchased license(s) for ProblemTracker Enterprise Edition Version 5.0.2 (PTEE 5.0.2), please review the information in the following section:
Alerts (PTEE 5.0.2)
The Alerts feature is included in PTEE 5.0.2. Alerts allows you to schedule a notification message to be sent for a record at a particular date and time. These alert messages can be used as reminders to take action on a record or can be used to escalate a record which has not progressed through the workflow. To set up the Alerts feature after your upgrade to PTEE 5.0.2, please review the Customizing Alerts section of the Online Help document.
Discussion (PTEE 5.0.2)
The Discussion feature is included in PTEE 5.0.2. Discussion allows you to initiate discussions within a record in ProblemTracker. These discussions allow your users to collaborate on various topics relevant to a record in parallel to the record's progress through the workflow. To set up the Discussion feature after your upgrade to PTEE 5.0.2, please review the Customizing Discussions section of the Online Help document.
Download Link and Upgrade Instructions
Download Information
Go to the Support Downloads page to download the latest version of ProblemTracker and any applicable patches, then return to this section for the detailed instructions to upgrade your installation. Click here to download ProblemTracker Enterprise Edition Version 5.0.2 (PTEE 5.0.2). Otherwise, click here for ProblemTracker Version 5.0.2 (standard edition).
Upgrade Instructions
Section 1 - Backup your ProblemTracker Installation
For Access Users:
For each of items below, a default path is listed. The "<installation directory>" mentioned in the path may be "C:\Inetpub\wwwroot" for Internet Information Server users. Or, it may be a value other than the default if the default was overridden in the original installation. Typically it is at the "root" of your (virtual) web site.
- Copy all ProblemTracker workgroup database files which are to be upgraded and archive the copies in a safe location.
These files are shown below for a default installation.
<installation directory>\workgroup\Database\Bugtrack.mdb
- Copy all ProblemTracker workgroup attachment files and archive the copies in a safe location. These files are located in the path (folder) shown below for a default installation.
<installation directory>\workgroup\Attachments
- If you have customized the login page with your own html, you need to back up the corresponding files as well. These files are located in the path (folder) shown below for a default installation.
<installation directory>\workgroup\loginbottom.htm
<installation directory>\workgroup\logintop.htm
- If you have implemented any additional web server security measures on your ProblemTracker workgroups, this security will be altered after running the upgrade operation on each workgroup. Additional web server security includes the recommendations in the Web Server Security Help section or other measures recommended by your system administrator (e.g. SSL, etc.). You will need to re-apply this additional security after you have completed the upgrade operation on each workgroup.
For SQL Server 7.0 / 2000 or Oracle Users:
For each of items below, a default path is listed. The "<installation directory>" mentioned in the path may be "C:\Inetpub\wwwroot" for Internet Information Server users. Or, it may be a value other than the default if the default was overridden in the original installation. Typically it is at the "root" of your (virtual) web site.
- For each workgroup, you may backup SQL Server 7.0/2000 or Oracle databas(es) by using SQL Server or Oracle backup or data export operation. Backups may done to a hard disk as well as to tape. Please review your SQL Server or Oracle documentation for further information.
- Copy all ProblemTracker workgroup attachment files and archive the copies in a safe location. These files are located in the path (folder) shown below for a default installation.
<installation directory>\workgroup\Attachments
- If you have customized the login page with your own html, you need to back up the corresponding files as well. These files are located in the path (folder) shown below for a default installation.
<installation directory>\workgroup\loginbottom.htm
<installation directory>\workgroup\logintop.htm
- If you have implemented any additional web server security measures on your ProblemTracker workgroups, this security will be altered after running the upgrade operation on each workgroup. Additional web server security includes the recommendations in the Web Server Security Help section or other measures recommended by your system administrator (e.g. SSL, etc.). You will need to re-apply this additional security after you have completed the upgrade operation on each workgroup.
IMPORTANT NOTE FOR ALL USERS: It is REQUIRED that you either copy the database file(s) to a safe place (Access only) or perform a backup (Access, SQL Server or Oracle).
UNDER NO CIRCUMSTANCES IS NETRESULTS RESPONSIBLE FOR THE LOSS OF ANY DATA AS THE RESULT OF THE INSTALLATION PROCESS.
Section 2 - Running the Installation Set up Program and Performing the Upgrade from Version 3.6.1 or earlier to Version 5.0.2
- GO TO SECTION 1.0 ABOVE AND BACKUP ALL OF YOUR PROBLEMTRACKER DATABASES BEFORE PROCEEDING.
- ProblemTracker Version 5 requires a new license key. Your ProblemTracker Version 3 license key(s) will not function with ProblemTracker 5. Please do not install ProblemTracker Version 5.0.2 if you do not have your Version 5 License Keys. Installing Version 5 without your Version 5 keys may result in an inability to login to your workgroups (because you have more users than licenses entered) and / or unexpected changes to your users (floating users will be converted to static users if a floating license key is not entered). NetResults Sales will send you a Version 5 key if your support and upgrades subscription is current. Please contact NetResults Sales at Sales@NetResultsCorp.com if you have licensing or subscription questions.
- Prior to installing ProblemTracker Version 5, please make sure all users are logged out of each workgroup(s). Failure to do this before installing Version 5.0.2 will result in your workgroups being "locked" because you will not be able to log the users out (because access to the previous version is denied until the workgroup is upgraded) and will not be able to proceed with the upgrade until the users are logged out.
- If you are using SQL Server or Oracle on a machine remote from your ProblemTracker server, you may run into an ASP script timeout error when trying to upgrade to this version from Version 4.0.3 or earlier. Please refer to the ASP upgrade timeout FAQ entry for instructions to set this timeout to a larger value in order to succeed with the upgrade.
- If you have a workgroup(s) using Oracle or case-sensitive SQL Server as the database type AND you have user accounts that have the same name but only differ in case (for example, you have a user id called "user_one" and another user id called "User_One" in the same workgroup, you will need to rename one of these users before upgrading. Rename one of the user accounts so that the user ids are not the same when the case is ignored. For example, you could change the user id "User_One" to be "user1". To rename a user account, login as Admin to the workgroup(s) where this user account is present, click on the Admin icon, then click on the User Administration button. Click on the edit button to the left of the user account you wish to modify. Change the user id, then click OK to save your changes.
- Temporarily disable any anti-virus software while you run the Version 5 installation program and perform configuration steps in the Workgroup Management System (WMS). This is recommended so that your anti-virus software will not prevent the installation program or WMS from performing operations such as copying files, running scripts, configuring your web server, setting file permissions and registry entries. Your anti-virus software can be reactivated safely after you have completed the installation steps and any necessary WMS configuration.
- This procedure assumes that you are installing ProblemTracker Version 5 on the same machine where you have ProblemTracker 3 installed. If you are installing ProblemTracker Version 5 on a different machine than where you have ProblemTracker 3 installed, please review the following FAQ entry for instructions: http://www.nrtracker.com/support/faq.html#moveupgrade40
Install ProblemTracker 5.0.2 or ProblemTracker Enterprise Edition 5.0.2. To do this, login to the web server machine as Administrator and then run (double-click from Windows Explorer) pbtrk502.exe (ProblemTracker 5.0.2) or ptee502.exe (ProblemTracker Enterprise Edition 5.0.2). During the installation setup program, you will be prompted to select a server time zone. Please ensure that you select the same time zone as the time zone set in your operating system. Failure to select the same time zone as your operating system's setting will result in incorrect date and time values in your ProblemTracker data. These incorrect values cannot be corrected at a later time. Enter your license key(s) information by going to Start->Programs->NetResults ProblemTracker 5->ProblemTracker License Manager
After the installation setup program has finished, you will be asked to reboot your system
- Log into the Workgroup Management System by going to Start->Programs->NetResults ProblemTracker 5->Workgroup Management System
Click on the Admin icon and select the option "Upgrade Workgroups from versions 3.x to ProblemTracker 5.0.2", then click on the Continue button.
- In the Current Workgroup details section, type in the current workgroup name, select the current database type and web site, then click on the Continue button to proceed.
- In the New Workgroup details section, enter information for the new workgroup including Workgroup Name, Description, Location, Template, Web Site, Host Name/IP Address, Port Number, and history comment. If using Access as your database type, please choose a workgroup name and location that are different than your current 3.x workgroup. This is very important because choosing an identical name will cause you to overwrite your 3.x workgroup. If you are using SQL Server as your database type, the Version 3 database will be upgraded whether you choose a different name or use the same name. Please make sure you have a backup of your database before proceeding. Once you have entered the necessary information, if you are using Access as your database type, uncheck the box for "re-direct your Version 3 workgroup URL to your Version 5 database". If you are using SQL Server, you may check this box for re-direction. Click on the Continue button to proceed with the upgrade process.
- A confirmation screen listing information for both the current workgroup and the new workgroup will be displayed. Click on the Back button to make any necessary changes. Otherwise, click on the Upgrade Workgroup button to complete the Upgrade operation. Click OK to confirm. A confirmation page will be displayed confirming that the workgroup files have been upgraded. Click on the Continue button to proceed with upgrading the data for the workgroup, then click OK to confirm the operation.
Another confirmation page will be displayed listing several areas of your database that need a time zone selection. Select a time zone for each these areas. The time zone you select can be different from the time zone you selected for your ProblemTracker server during the Version 5.0.2 installation setup. Click on the Upgrade Data button to proceed, then click OK to confirm. Click OK after the upgrade operation has completed.
Once the database has been upgraded successfully, a confirmation page will be displayed. You will be prompted to upgrade your users. Click on the Upgrade Users button to proceed. Depending on the users you have in your workgroup and the number of workgroups you have, it is possible to have user conflicts that need to be resolved before you can upgrade your users. The conflicts arise because multiple workgroups have the same user id, but the user profile information (name, email address, etc.) is different in each workgroup. If a conflict exists for a particular user id, a "Yes" button will be present in the "User Details Conflict?" column. If all of the user ids listed display "No" in the "User Details Conflict?" column and there are no "Resolve" buttons in the "Action" column, proceed to step 14. If any user ids have "Yes" in the "User Details Conflict?" column, click on the "Resolve" button that appears in the "Action" column for the user account.
The next page will display the "Existing User Details" for the user id. This information is the profile information present in the Workgroup Management System for this workgroup because you have already upgraded a workgroup to 5.0.2 or you are using one of ProblemTracker's standard users (i.e., dev_mgr or process_mgr). The user account's profile information as entered in the workgroup you are upgrading will be displayed in the "Workgroup User Details" column. You can choose to do one of the following to resolve the user conflict:
- You can either select the user profile information present in one of the columns (by selecting either "Existing User Details" or "Workgroup User Details" in the pulldown at the top of the "Resolved User Details" column). Click on the Update button to proceed.
- You can select the user profile information present in one of the columns (by selecting either "Existing User Details" or "Workgroup User Details" in the pulldown at the top of the "Resolved User Details" column), then change any of the information you would like to save in the user's profile. Choosing this option will result in the user account being saved with the profile information entered in the "Resolved User Details" column. Click on the Update button to proceed.
You can create a new user account to resolve the conflict. To choose this option, select the user profile information present in one of the columns (by selecting either "Existing User Details" or "Workgroup User Details" in the pulldown at the top of the "Resolved User Details" column), then change the user id in the "Resolved User Details" column to be different from the user id displayed in the other columns. You cannot select a user id that is already in use by another workgroup or a user id that is the same as a default user (such as dev_one, dev_mgr, process_mgr, etc.). You may also change any other user profile information in the "Resolved User Details" column, then click on the Update button to create this new user account. This will resolve the user conflict and the existing user account already present in the Workgroup Management System (displayed in the "Existing User Details" column) will be preserved. This new user account will be counted toward the license limits for the keys you have entered in the ProblemTracker License Manager. Once you have renamed the user id and click on the Update button, you will not have another opportunity to change this user's profile information until after the "Upgrade Users" process is complete. After the users have been upgraded, you can use the Edit User option in the License Administration section of WMS to make changes to this user.
After making your selection and / or entering the user details in the "Resolved User Details" column, click on the Update button. Click on the "Resolve" button for another user to continue resolving the conflicts.
Users with "No" displayed in the "User Details Conflict?" column do not have a conflict present. If you wish to modify the profile information for a user which had a conflict resolved, click on the "Edit" button displayed in the "Action" column for the user account, select one of the options in the pulldown at the top of the "Resolved User Details" column to fill the user profile details in this column (the "Resolved User Details" choice will fill the column with the values that were saved for this user when the conflict was resolved), modify the profile information, then click Update to save your changes.
Repeat this step until all user conflicts have been resolved. All user conflicts are resolved when all users have "No" listed in the "User Details Conflict?" column and there are no longer any "Resolve" buttons in the "Action" column.
If you need to change the license type of any of your users (for example, you have purchased floating licenses in addition to your static licenses and want to update some of your users to use the floating licenses), click on the "Edit" button and change the "license type" of the user and click on the Update button. If you receive a warning that prompts you that you do not have that license type entered, you can safely click OK to continue with this operation. You can change the license types for your users, then enter your license key(s) information by going to Start->Programs->NetResults ProblemTracker 5->ProblemTracker License Manager. Then, return to the Workgroup Management System to proceed with upgrading your users.
PLEASE NOTE: It is very important to complete the Upgrade Users operation for each workgroup BEFORE you and your users login and begin using the workgroup. Not doing so can result in unexpected behavior and / or damage to your database. If for some reason you canceled out of the Upgrade Users section ( because you had to enter licenses or were not sure how to resolve all of the conflicts), you can return to this section by performing the following steps:
- Go to the Workgroup Management System Home Page
- Click on the Workgroup Database Tools icon to the left of the workgroup that needs to have the users upgraded.
- Select the option "Upgrade Data Only" and click on the Continue button.
- On the confirmation page, click on the "Upgrade Data" button. Click OK to confirm the operation. You will receive a warning that says that the database is already upgraded.
- Click on the Upgrade Users button to proceed with upgrading the users.
- Refer to the information at the beginning of this step to resolve any user conflicts or make any changes to a user account before completing the Upgrade Users operation.
- Once all user conflicts are resolved (when all users have "No" listed in the "User Details Conflict?" column and there are no longer any "Resolve" buttons in the "Action" column), click on the Upgrade Users button. When the users have been upgraded, a confirmation page will be displayed. Click OK to return to the Administration Menu.
- Go back to the Workgroup Management System Home Page. To login to your upgraded workgroup, click on the key icon to the left of the workgroup name from the list on the WMS Home Page. Login to the workgroup to confirm that the upgrade was successful.
- Repeat steps 9 - 15 for each workgroup you have in the Workgroup Management System.
- After upgrading all the workgroups to Version 5.0.2, login to each of the workgroups and make sure that the upgrade was successful. After doing this, uninstall ProblemTracker 3 from your machine following the steps below.
- Select "Start / Programs / NetResults ProblemTracker 3 / Modify-Uninstall ProblemTracker".
- When the uninstall starts, click "Next".
- Select "Remove" option and click "Next".
- > For SQL Server or Oracle Users:
Select "Components only (leave databases)" option as SQL Server or Oracle database(s) are upgraded "in place". If you select "Components and databases", you will delete the 5.0.2 SQL Server or Oracle database(s).
> For Access Users:
Select "Components and databases" option as Access database(s) are copied before being upgraded.
- Click "Next" and complete the uninstallation.
-
Reactivate your anti-virus software and re-start IIS services.
- If you have implemented any additional web server security measures on your ProblemTracker workgroups, this security will be altered after running the upgrade operation on each workgroup. Additional web server security includes the recommendations in the Web Server Security Help section or other measures recommended by your system administrator (e.g. SSL, etc.). You will need to re-apply this additional security now that the workgroups have been upgraded.
Your system has now been upgraded to Version 5.0.2 for all workgroups.
Once you have installed ProblemTracker, information about logging into the Workgroup Management System for the first time can be found in the Version 5 Online Help document in the section called Logging In to WMS.
The URL to login to a ProblemTracker 5 workgroup is different from Version 3.6.1 or earlier. The URL is now http://servername/workgroup/ptlogin.asp where servername is the TCP/IP name of the machine where ProblemTracker 5 is installed. You can also, optionally, omit the "/ptlogin.asp" part as this is the default page for the workgroup.
Support Resources
If you have feedback or questions about this release, please contact NetResults Technical Support for assistance. A Version 5 Online Help document is also available for this release. If you receive any errors during the installation, upgrade process, or while using ProblemTracker, please consult the Installation Errors section of the FAQ and/or the Known Issues section of this page.
|